Precious Metal Clay Firing Methods
Firing is how Art Clay turns into pure silver. This is where it all happens. Everything else you have done has been a prelude to this little bit of technological alchemy. No matter which method you use to fire Art Clay, the process is the same: burning the organic binders off and sintering the silver particles to increase strength. In the end, you have a piece of 99.9% fine silver, just 8-9 percent smaller and with all the fine detail and shape of the pre-fired piece.
Gas Stovetop Firing
If you have a gas stove in your kitchen or portable camping stove, this is the most convenient and inexpensive method of firing Art Clay Silver.
All you need is a stainless steel net large enough to settle and balance the piece on the stove burners, a pair of tweezers, and a timer.
Firing Art Clay Silver with a gas stove uses a direct flame.
This method works best for small and simple pieces. You can fire pure silver findings and small gemstones (5mm or under) with this method.
Items that cannot be fired with this method include projects made using Cork Clay, paper, or large quantities of organic material, and projects that include glass, ceramic or porcelain. Using these instructions, you can fire Art Clay Silver Series creations.
There is a size limitation for this method. You may fire creations that are no larger than 5.0cm (L) ×3.0cm (W) ×2.0cm (H), and weigh up to 30gm.
3 Ways to Fire Metal Clay
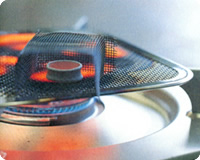
1. Firing on a Gas Stove
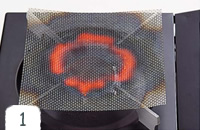
Place the stainless net on the cooking stove burner. Turn on the cooking stove. Confirm the most red-hot part on the stainless net.
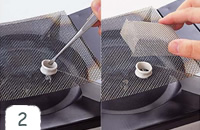
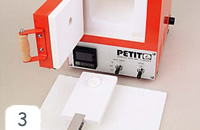
Turn off the cooking stove once again. Place the piece where the most red-hot part was using a pair of tweezers. Cover the piece with the stainless cage.
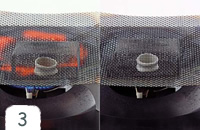
Firing on a Gas Stove Turn on the cooking stove again and fire the piece for five minutes. You will see that the piece starts turning an orange color during heating. Turn off stove and cool for at least 20 minutes.
As you heat the Art Clay® the binder will burn off and you may see a small flame. As the piece continues to heat, it will turn dark brown and then white. Pay close attention to the changes in the color--the piece will remain white, but will start to glow with a salmon-colored hue. Hold this salmon hue until the piece is heated thoroughly for its size.
Here is a guide for firing times
| Volume of Clay | Approximate Firing Time |
| up to 5 grams | 1 - 1.5 minutes |
| 6 to 14 grams | 2 minutes |
| 16 - 25 grams | 3 -4 mintues |
2. Gas Torch Firing
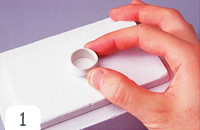
Place a fiberboard on a fire brick. Place the piece on the fiberboard.
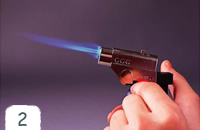
Switch on the gas torch.
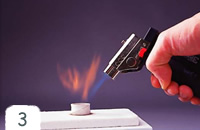
Hold the torch and fire the piece evenly. When the piece turns orange, continue to fire the piece keeping the same color for the appropriate firing time.
When you light the torch, look at the fire stream and take notice of the blue tip within that stream. Direct the flame at a 45 degree angle, keep the blue tip about 6 - 8 mm away from the piece, and rotate the flame around the so you heat the entire piece evenly.
As you heat the Art Clay® the binder will burn off and you may see a small flame. Keep the torch going around and around the piece during this stage. As the piece continues to heat, it will turn dark brown and then white. Pay close attention to the changes in the color--the piece will remain white, but will start to glow with a salmon-colored hue. Hold this salmon hue until the piece is heated thoroughly for its size.
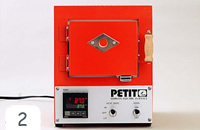
3. Kiln Firing
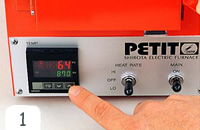
Put the piece (on a fiber board) into a kiln. Turn on the switch and program the kiln to an applicable firing temperature.
When the temperature is reached, hold for the appropriate holding time.
Turn off the kiln after the holding time. Take out the piece when cold.
Kiln firing gives you the most precise control over temperature and firing time.
The Sintering Process
When silver metal clay is fired the binder is first burnt away and then the nano-particles fuse together in a process called sintering. The longer the piece is fired the more completely the particles fuse together, and the stronger the piece will be. So there is a trade-off between firing time and strength. Also the higher the temperature the faster the sintering process will progress.
At a temperature of 650ºC fine silver becomes open to fusing but is "cool" enough to retain its form. This the range of sintering temperatures for fine silver range between 650ºC and 900ºC. ( The melting point of 99.9% fine silver s 960.5ºC, at this temperature the silver will become liquid.)
Depending on the shape of your piece, during the sintering process it is possible that the piece could sag or collapse due to gravity. Provide support for your piece during firng using vermiculite, or alumina hydrate powder. Also consider firing at the lower end of the temperature range.
Suggested FiringTimes for Silver Metal Clay in a Kiln
The table below give the recommendation for minimum hold time. As long as the temperature remains below melting point you can safely fire for a longer period. If you have a piece that has some thicker areas it is recommended to extend your hold time.
| Temperature | Suggested Minimum Hold Time for Art Clay Silver |
| 650ºC / 1200ºF | 30 minutes |
| 700ºC / 1290ºF | 25 minutes |
| 750ºC / 1380ºF | 20 minutes |
| 800ºC / 1470ºF | 15 minutes |
| 850ºC / 1560ºF | 10 minutes |
| 900ºC / 1650ºF | 5 minutes |
| 900ºC / 1650ºF | Optimum hold time 2 hrs |
Remember melting point for 99.9% fine silver is 960.5ºC. Make sure the temperature reading of you kiln is accurate and that it does not overshoot during the heating process.